기존 CRUD 게시판에 댓글 작성 시 감정 분석 API를 사용해 긍정, 중립, 부정으로 댓글 태그를 관리해 사용자가 원하는 댓글만 필터링하기 위해 댓글 작성 서비스에 네이버 API 적용 및 댓글 작성 및 조회를 구현했다.
댓글관리를 위한 Comment Entity 및 DTO 생성
@Entity
@Getter
@NoArgsConstructor
public class Comment {
    @Id
    @GeneratedValue(strategy = GenerationType.IDENTITY)
    private Long id;

    private String content;
    @Enumerated(EnumType.STRING)
    private Emotion emotion;
    @ManyToOne
    @JoinColumn(name = "post_id")
    @Setter
    private Post post;
    @ManyToOne
    @JoinColumn(name = "user_id")
    @Setter
    private User user;

    @Builder
    public Comment(String content, Emotion emotion, Post post, User user) {
        this.content = content;
        this.emotion = emotion;
        this.post = post;
        this.user = user;
    }
}@Data
public class CommentCreate {
private String content;
private Emotion emotion;
private Post post;
private User user;
@Builder
public CommentCreate(String content) {
this.content = content;
}
public Comment toEntity(){
return Comment.builder()
.content(content)
.emotion(emotion)
.post(post)
.user(user).build();
}
}User 및 Post는 컨트롤러가 아닌 서비스에서 처리하기 위해 @Data 사용
@Getter
public class CommentResponse {
    private Long id;
    private String content;
    private Emotion emotion;
    private String username;
    private Long userId;
    private Long postId;

    @Builder
    public CommentResponse(Comment comment) {
        this.id = comment.getId();
        this.content = comment.getContent();
        this.emotion = comment.getEmotion();
        this.postId = comment.getPost().getId();
        this.userId = comment.getUser().getId();
        this.username = comment.getUser().getUsername();
    }
}Post Entity DTO, User Entity에 Comment 추가
@Getter
@NoArgsConstructor
@Entity
public class Post {
    @Id
    @GeneratedValue(strategy = GenerationType.IDENTITY)
    private Long id;
    @Column(length = 50, nullable = false)
    private String title;
    @Column(columnDefinition = "TEXT", nullable = false)
    private String content;

    @ManyToOne(fetch = FetchType.LAZY)
    @JoinColumn(name = "user_id")
    @Setter
    private User user;

    @OneToMany(mappedBy = "post")
    private List<Comment> comments = new ArrayList<>(); // Comment List 추가

    @Builder
    public Post(String title, String content, User user) {
        this.title = title;
        this.content = content;
        this.user = user;
    }

    public void edit(PostEdit postEdit) {
        this.title = postEdit.getTitle();
        this.content = postEdit.getContent();
    }

    public void addComment(Comment comment) { // 연관관계 편의 메소드 추가
        this.comments.add(comment);
        comment.setPost(this);
    }
}
@Entity
@Getter
@NoArgsConstructor
public class User {
    @Id
    @GeneratedValue(strategy = GenerationType.IDENTITY)
    private Long id;
    @Column(unique = true, nullable = false)
    private String username;
    @Column(nullable = false, length = 100)
    private String password;

    @Enumerated(EnumType.STRING)
    private Roles role;
    @OneToMany(mappedBy = "user")
    private List<Post> posts = new ArrayList<>();
    @OneToMany(mappedBy = "user")
    private List<Comment> comments = new ArrayList<>(); // Comment List 추가

    @Builder
    public User(String username, String password, Roles role) {
        this.username = username;
        this.password = password;
        this.role = role;

    }

    public void addPost(Post post) {
        post.setUser(this);
        posts.add(post);
    }

    public void addComment(Comment comment) { // 연관관계 편의 메소드 추가
        comment.setUser(this);
        comments.add(comment);
    }
}순환참조를 끊으면서 View 단에서 댓글 작성자를 보여주기 위해 UserId, Username으로 나눠서 담음.
후에 User의 정보에 접근하려면 UserRepository에서 UserId 기준으로 접근해서 사용할 예정
CommentService
@Service
@RequiredArgsConstructor
public class CommentService {
    private final CommentRepository commentRepository;
    private final PostRepository postRepository;
    private final UserRepository userRepository;


    public void save(CommentCreate commentCreate, String username, Long postId) throws JsonProcessingException {

        // commentCreate.setEmotion(emotion); 네이버 감정분석 API로 댓글 분석 후 적용
          Comment comment = commentCreate.toEntity();

        User user = userRepository.findByUsername(username).orElseThrow();
        user.addComment(comment);
        Post post = postRepository.findById(postId).orElseThrow();
        post.addComment(comment);

        commentRepository.save(commentCreate.toEntity());
    };
}스프링에서 외부 API 사용
대충 API 사용법은 키를 갖고 헤더, 바디에 API서버에서 정해준 기준에 따라 넣고 요청을 보내면 원하는 요청 값을 파싱해서 쓴다고 알고 있었는데 API 호출을 어떻게 할까 찾아보니 스프링3.0부터 제공하는 RestTemplate을 사용해 간편히 구현했다. 곧 폐지되고 WebClient로 대체 될 예정이라고 하는데 프로젝트 기능을 다 구현하면 리팩터링을 해야할 거 같다.
API Key 환경 변수 설정 및 @Value로 코드에서 주입받기
요청할 API Key Id, API Key는 외부에 노출되면 안되기 때문에 application-security.yml에 환경변수로 설정하고 스프링 내에서 주입 받아 사용할 수 있다.
application-security.yml
external:
  api:
    name: naver
    key-id: X-NCP-APIGW-API-KEY-ID
    key: X-NCP-APIGW-API-KEY
    id-value: {YOUR_KEY_ID}
    key-value: {YOUR_KEY}
url: https://naveropenapi.apigw.ntruss.com/sentiment-analysis/v1/analyze네이버 감정분석 API 요청, 응답
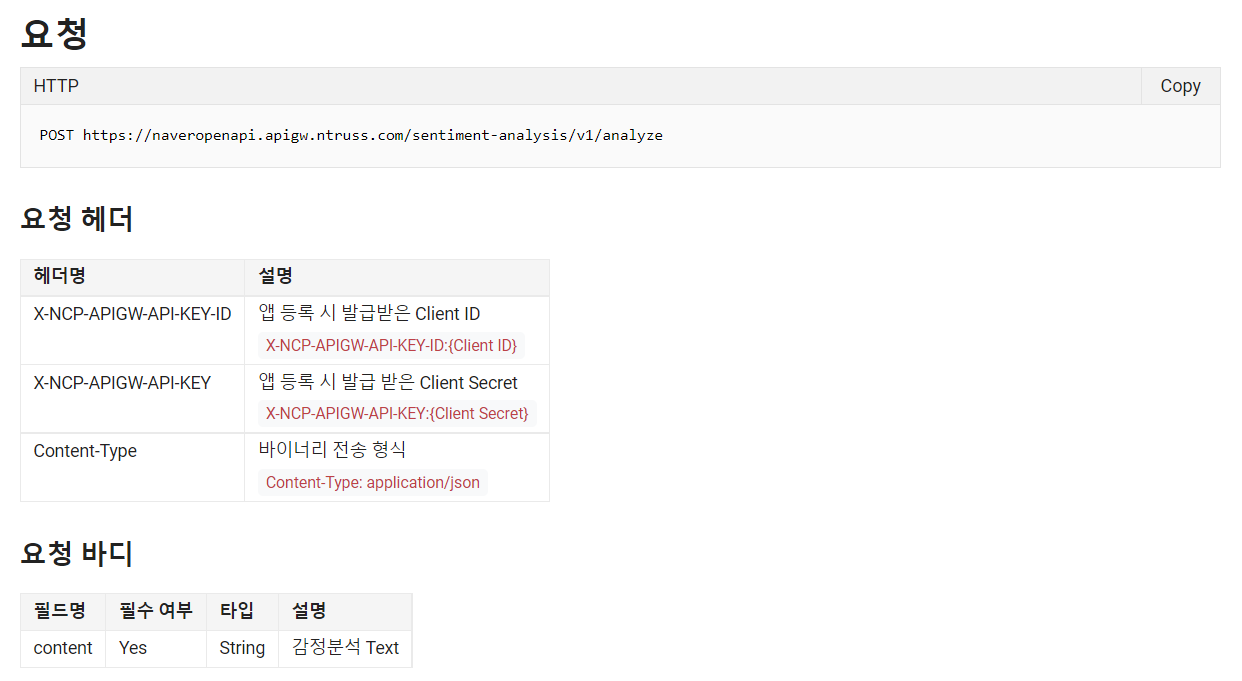
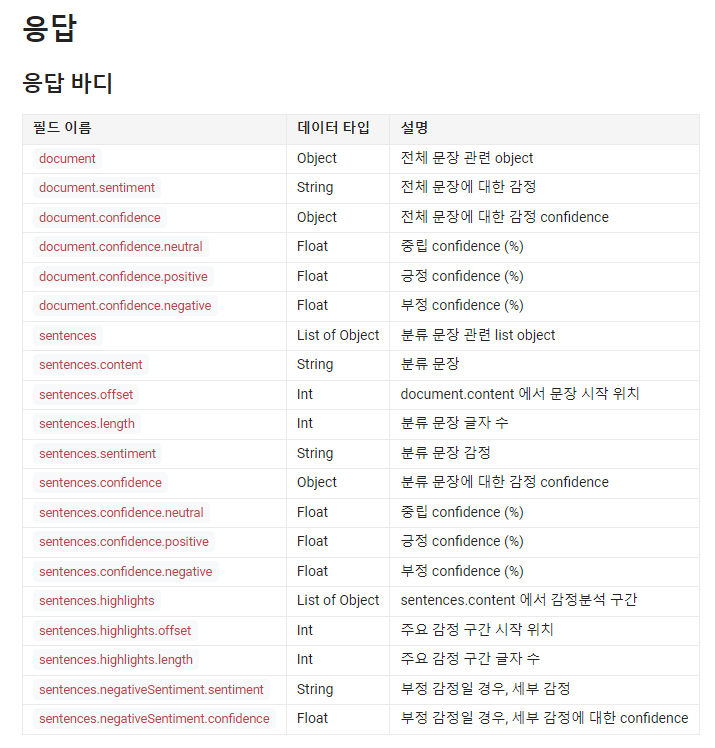
요청에 필요한 content, 응답에서 사용할 document.sentiment를 ObjectMapper사용으로 java class와 json 출력을 오갈 수 있다.
ObjectMapper는 Java의 JSON 직렬화/역직렬화 라이브러리인 Jackson의 클래스이다.
사용할때 알아야할 점은 JAVA -> JSON은 직렬화이고 직렬화할땐 JAVA객체에 GETTER가 있어야 한다.
Jackson라이브러리는 GETTER로 필드를 인식하기 때문이다.
JSON -> JAVA는 역직렬화이고 역직렬화할땐 JAVA객체에 파싱한 필드들이 들어갈 생성자가 있어야 한다.
사용해보니 필드값이 들어간 생성자 외에 기본 생성자도 있어야 오류가 나지않고 작동한다.
Jackson 라이브러리는 리플렉션 API를 사용해 기본생성자로 클래스를 만들어 사용하기 때문이다.
Request Class
@Getter
public class EmotionDiscrimination {
    private String content;

    public EmotionDiscrimination(String content) {
        this.content = content;
    }
}Response Class
@Getter
@AllArgsConstructor
@NoArgsConstructor
public class Json {
    private Document document;

    @Override
    public String toString() {
        return this.document.getSentiment();
    }
}

@Getter
@AllArgsConstructor
@NoArgsConstructor
public class Document {
    private String sentiment;

}HttpEntity+ObjectMapper+RestTemplate으로 API 호출
@Component
@RequiredArgsConstructor
@Slf4j
public class TemplateCreate {
    private final ObjectMapper objectMapper;

    @Value("${external.api.key-id}") // application.yml 환경변수 주입
    private String keyId;

    @Value("${external.api.key}") // application.yml 환경변수 주입
    private String key;
    @Value("${external.api.id-value}") // application.yml 환경변수 주입
    private String idValue;

    @Value("${external.api.key-value}") // application.yml 환경변수 주입
    private String keyValue;

    @Value("${external.api.url}") // application.yml 환경변수 주입
    private String url;


    public Json createTemplate (EmotionDiscrimination emotionDiscrimination) throws JsonProcessingException {
        //header api id, key 추가
        HttpHeaders header = new HttpHeaders();
        header.add(keyId, idValue);
        header.add(key, keyValue);
        header.setContentType(MediaType.APPLICATION_JSON);
        StringBuilder json = new StringBuilder();
        // json 변환
        try {
            json.append(objectMapper.writeValueAsString(emotionDiscrimination));
        } catch (JsonProcessingException e) {
            throw new RuntimeException(e);
        }
        // api 호출
        RestTemplate restTemplate = new RestTemplate();
        HttpEntity<?> entity = new HttpEntity<>(json.toString(), header);
        ResponseEntity<String> exchange = restTemplate.exchange(url, HttpMethod.POST, entity, String.class);

        // api 호출 값 반환
        log.info("sentiment api value : {}", exchange);
        objectMapper.configure(DeserializationFeature.FAIL_ON_UNKNOWN_PROPERTIES, false);

       Json jsonMapper = objectMapper.readValue(exchange.getBody(), Json.class); // 응답 바디 값 ObjetMapper 사용

        return jsonMapper;
    }
}요청 값
요청 헤더에 API KEY ID, API KEY, MediaType을 지정해주고, 감정 분석할 댓글을 ObjectMapper를 사용해 API서버에서 요청하는 "content" key와 댓글이 value로 들어간 HttpEntity를 생성하고 RestTemplate으로 API 호출한다.
응답 값
<200,{"document":{"sentiment":"neutral","confidence":{"negative":0.044515073,"positive":0.1141674,"neutral":99.84132}},"sentences":[{"content":"안녕하세요.","offset":0,"length":6,"sentiment":"neutral","confidence":{"negative":3.110167E-4,"positive":2.823361E-4,"neutral":0.9994066},"highlights":[{"offset":0,"length":5}]},{"content":" 잘부탁드립니다.","offset":6,"length":9,"sentiment":"neutral","confidence":{"negative":5.7928474E-4,"positive":0.0020010117,"neutral":0.9974197},"highlights":[{"offset":1,"length":7}]}]},[Server:"nginx", Date:"Sun, 08 Jan 2023 06:45:02 GMT", Content-Type:"application/json", Transfer-Encoding:"chunked", Connection:"keep-alive", x-ncp-trace-id:"32c1p6gsm4phg32c3561i6copo", x-ncp-apigw-response-origin:"ENDPOINT"]>
ObjectMapper.configure
ObjectMapper.configure(DeserializationFeature.FAIL_ON_UNKNOWN_PROPERTIES, false)를 사용하면 역직렬화할 클래스 필드에 있는 값만 받고 나머지 값들은 버릴 수 있다.
현재 API 응답 값에서 작성 댓글 전체의 감정만 필요하기 때문에 사용했다.
Emotion Enum, Comment Service API 호출로 받은 Emotion 추가
@Getter
@RequiredArgsConstructor
public enum Emotion {
    POSITIVE("positive"),
    NEUTRAL("neutral"),
    NEGATIVE("negative");

    private final String emotion;

    public static Emotion of(String sentiment){
        for(Emotion temp : Emotion.values()){ // json parsing 후 String 일치 시 Emotion Enum 반환
            if(sentiment.equals(temp.emotion))return temp;
        }
        throw new RuntimeException();
    }
}
@Service
@RequiredArgsConstructor
public class CommentService {
    private final CommentRepository commentRepository;
    private final PostRepository postRepository;
    private final UserRepository userRepository;
    private final TemplateCreate templateCreate;


    public void save(CommentCreate commentCreate, String username, Long postId) throws JsonProcessingException {
        Emotion emotion = emotionDiscrimination(commentCreate);
        commentCreate.setEmotion(emotion);

        Comment comment = commentCreate.toEntity();

        User user = userRepository.findByUsername(username).orElseThrow();
        user.addComment(comment);
        Post post = postRepository.findById(postId).orElseThrow();
        post.addComment(comment);

        commentRepository.save(commentCreate.toEntity());
    };
    // API 호출
    private Emotion emotionDiscrimination(CommentCreate commentCreate) throws JsonProcessingException {
        EmotionDiscrimination emotionDiscrimination = new EmotionDiscrimination(commentCreate.getContent());
        Json template = templateCreate.createTemplate(emotionDiscrimination);
        return Emotion.of(template.toString());
    }
}Comment Controller
@Controller
@RequiredArgsConstructor
public class CommentController {

    private final CommentService commentService;

    @PostMapping("/board/posts/{postId}/write")
    public String save(@PathVariable Long postId, CommentCreate commentCreate, Authentication authentication) throws JsonProcessingException {
        commentService.save(commentCreate, authentication.getName(), postId);
        return "redirect:/board/posts/{postId}";
    }
}댓글 작성자는 Spring Security에서 관리하는 Authentication으로 서비스에서 추가해주기 위해 파라미터로 받는다.
댓글 작성 View
<div class="card" th:fragment="commentForm">
    <div class="card-header">
        댓글 작성
    </div>
    <div class="card-body">
        <form th:action="@{|/board/posts/${post.id}/write|}"  sec:authorize="isAuthenticated()" method="post">
            <div class="form-group">
                <label for="content"></label>
                <textarea class="form-control" id="content" rows="3" name="content"></textarea>
            </div>
            <div class="d-flex justify-content-end">
            <button type="submit" class="btn btn-primary">Write</button>
            </div>
        </form>
        <form  sec:authorize="!isAuthenticated()" method="post">
            <div class="form-group">
                <label for="content"></label>
                <textarea class="form-control" id="content" rows="3" name="content" >로그인 후 댓글 작성가능합니다.</textarea>
            </div>
        </form>
    </div>
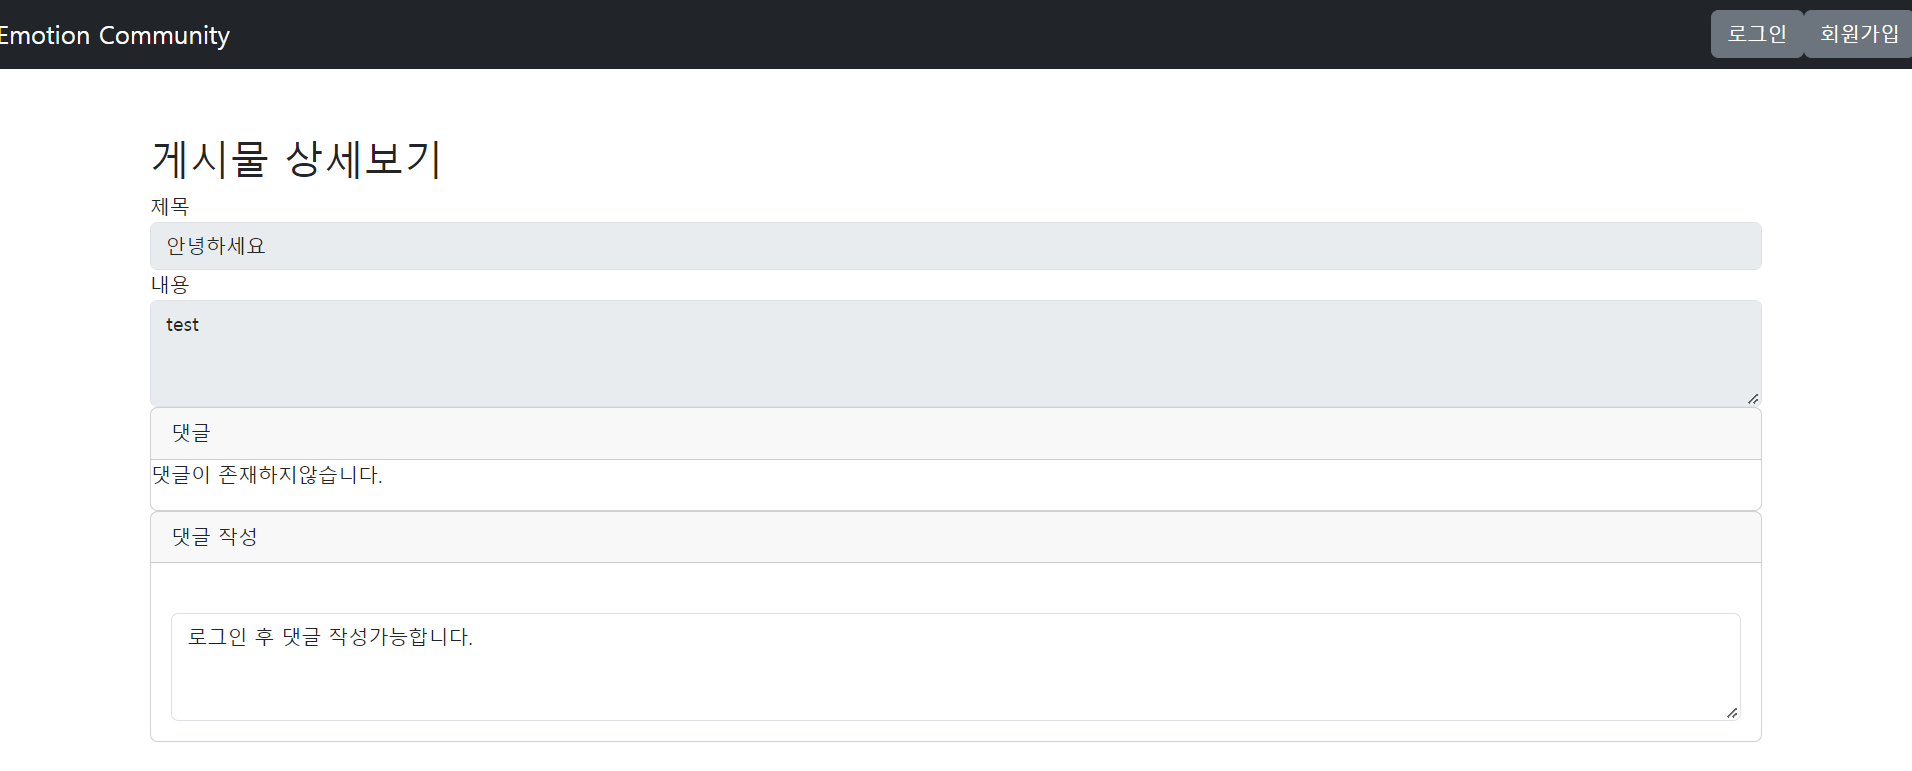
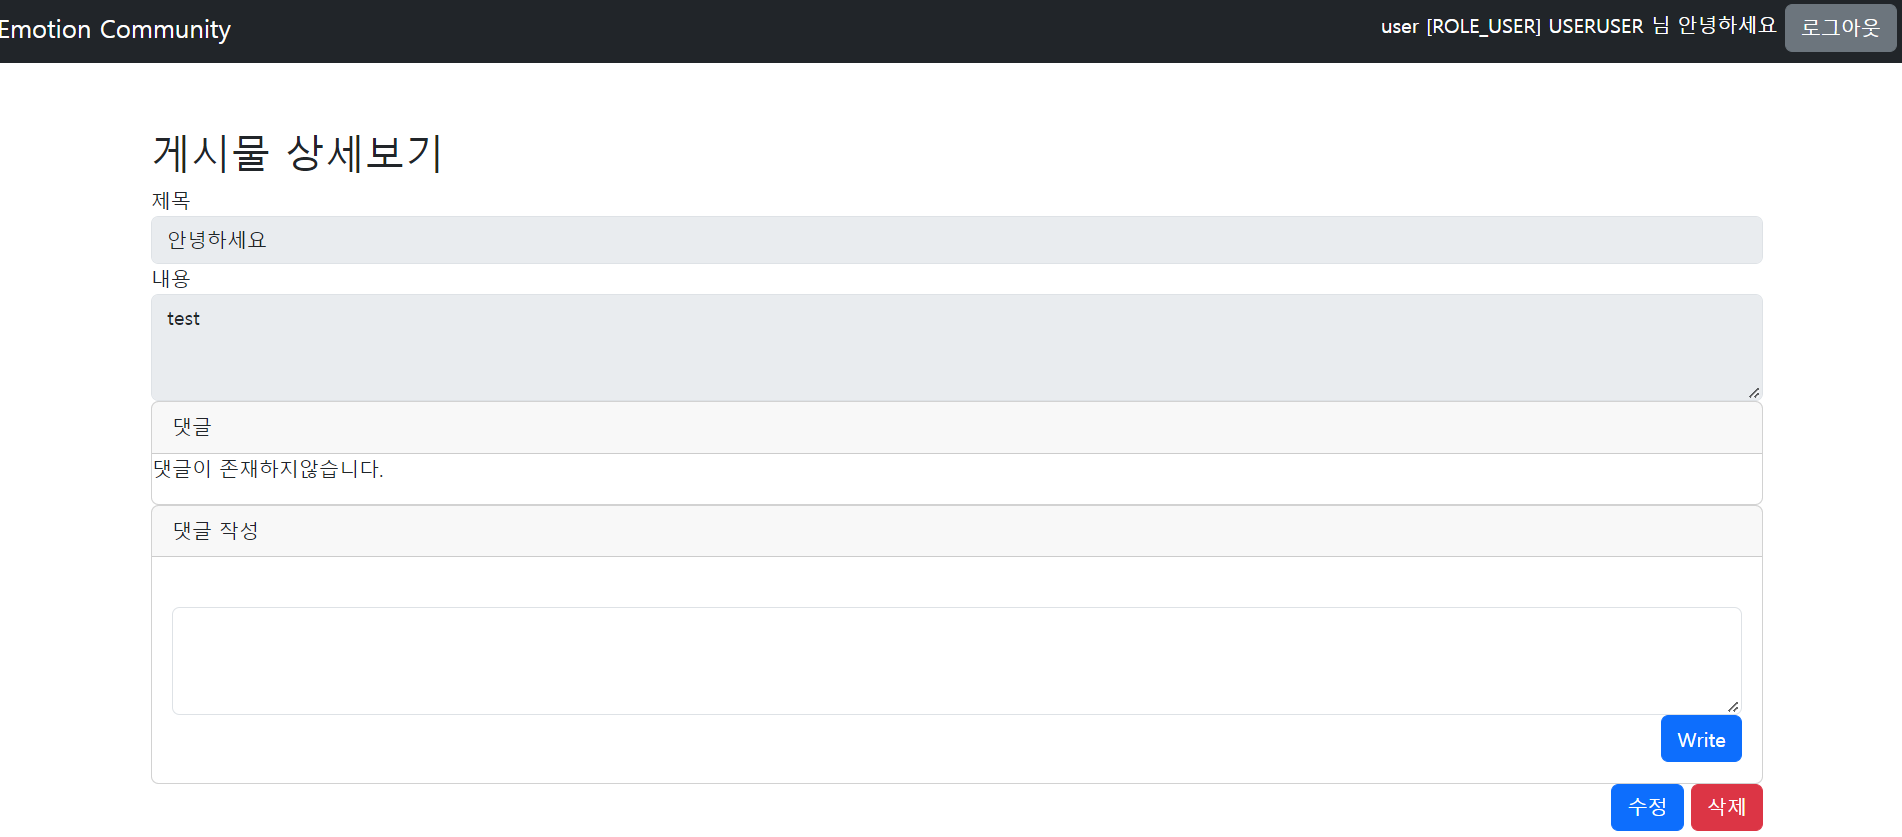
</div>Thymeleaf Security를 사용해 로그인 시에만 댓글 작성을 할 수 있게 하고 댓글 작성 시엔 댓글 컨트롤러로 값을 넘겨준다.
PostController
@Controller
@RequiredArgsConstructor
@RequestMapping("/board")
public class PostController {

    private final PostService postService;

    @GetMapping("/posts/{postId}")
    public String get(@PathVariable Long postId, Model model) {
        PostResponse postResponse = postService.get(postId);

        List<CommentResponse> comments = postResponse.getCommentResponses(); // 댓글 리스트 비어있지 않으면 모델에 추가
        if (!comments.isEmpty()) {
            model.addAttribute("comments", comments);
        }
        model.addAttribute("post", postResponse);
        return "post/postView";
}댓글 조회 View
<div class="card" th:fragment="commentList">
  <div class="card-header">
    댓글
  </div>
    <li class="list-group-item" th:if="${#lists.isEmpty(comments)}">
        <p> 댓글이 존재하지않습니다.</p>
    </li>
  <ul class="list-group-flush" th:if="${comments != null}">
    <li class="list-group-item" th:each="comment :${comments}">

            <span style="font-size: small" th:text="${comment.username}"></span>
            <button class="badge bi bi-pencil-square" >수정</button>
            <button class="badge bi bi-trash">삭제</button>
            <div th:text="${comment.content}"></div>

             <td th:switch="${#strings.toString(comment.emotion)}" >
               <span th:case="POSITIVE"  th:text="긍정" class="badge rounded-pill text-bg-success"/>
               <span th:case="NEUTRAL"  th:text="중립"  class="badge rounded-pill text-bg-secondary"/>
               <span th:case="NEGATIVE"  th:text="부정" class="badge rounded-pill text-bg-danger"/>
            </td>
    </li>
  </ul>
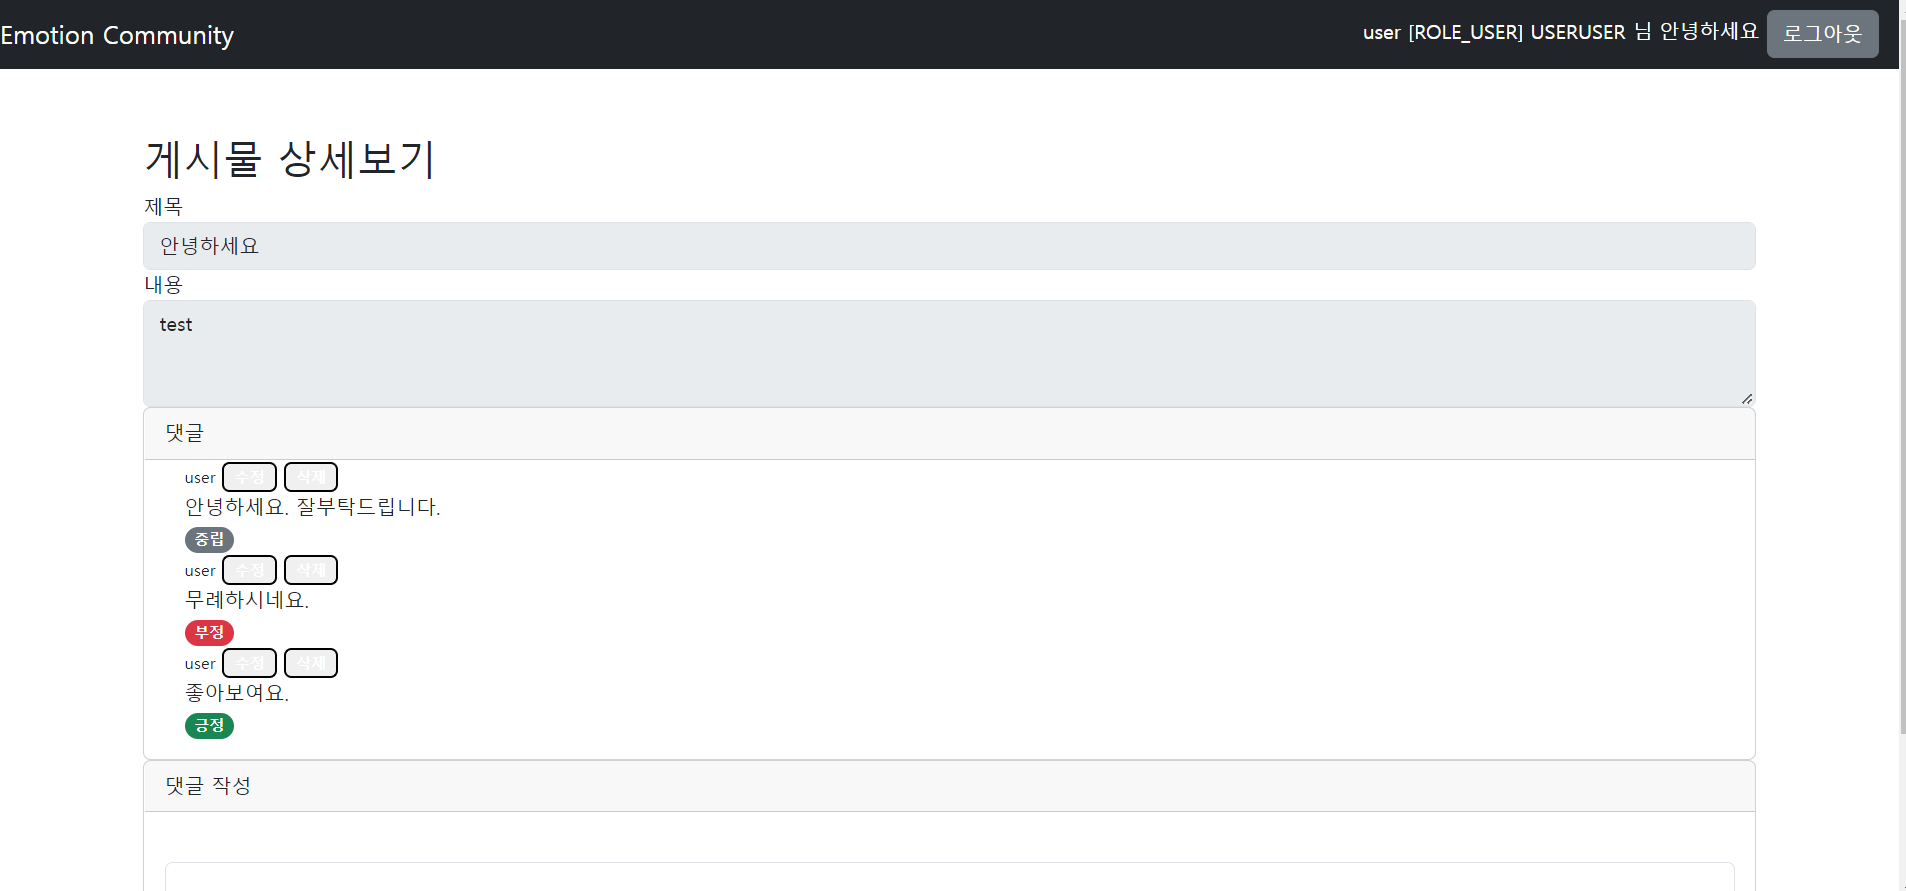
</div>댓글 리스트가 비어있을 때와 아닐때를 나눠서 보여주고, 댓글 작성시에 API 호출로 받은 감정을 thymeleaf switch 문법을 사용해 뱃지로 보여준다.
결과
개선
Entity와 DTO 변환 시에 연관관계가 맵핑이 되지 않는데 DTO에 연관관계에 관한 정보가 들어가야 하는지 모르겠다. 이후 공부 후 개선할 예정이다.>> Entity 연관관계 편의 메소드 삭제, DTO+setter로 연관관계 셋팅- 현재 RestTemplate 이용하는데 추후 Webclient로 변환 예정
댓글 삭제 수정 구현할때 글 삭제 수정까지 자기가 작성한 글들만 컨트롤 할 수 있게 구현할 예정
